1. TOC란?
Table of Contents, 목차이다.
내가 작성한 글의 markdown 소스에서 헤더 태그를 목차로 엮어 보기 쉽게 제공한다.
아래는 적용 결과이다. 티스토리 글 작성시 "제목1", "제목2" 서식과 같이 마크다운을 적용한 제목들을 간추려서 사이드에 목차로 보여지고, 이를 클릭하면 글에서 해당 제목 부분으로 이동한다.
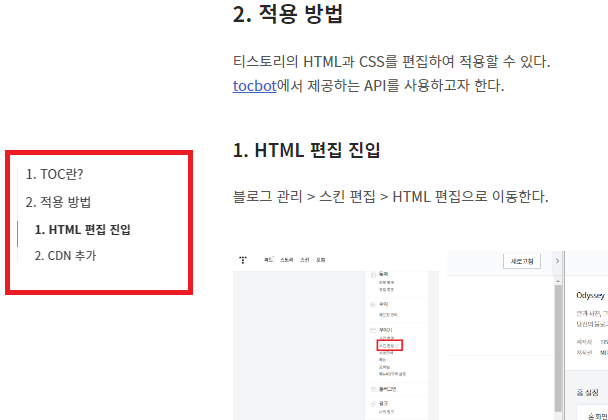
2. 적용 방법
티스토리의 HTML과 CSS를 편집하여 적용할 수 있다.
tocbot에서 제공하는 API를 사용하고자 한다.
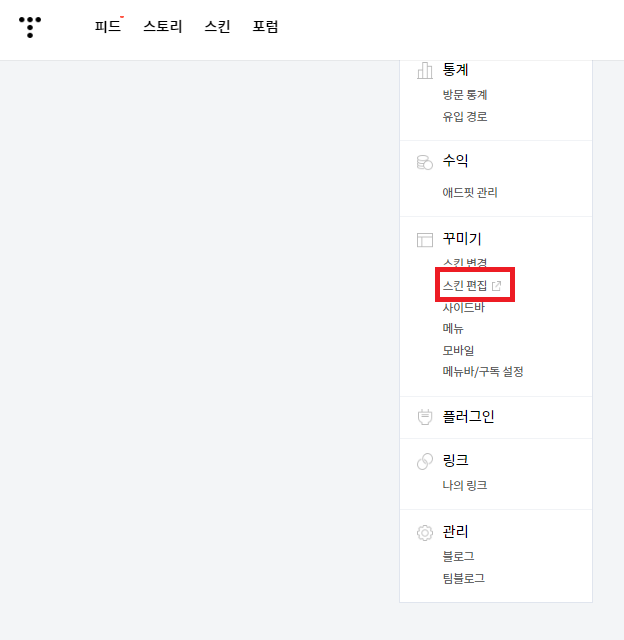
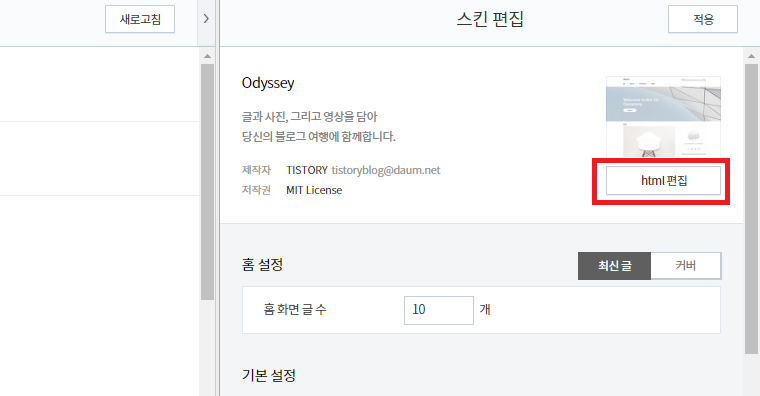
1. HTML 편집 진입
블로그 관리 > 스킨 편집 > HTML 편집으로 이동한다.
2. CDN 추가
1. <head> 부분에 가져올 스크립트 추가
html의 <head> 부분에 다음의 코드를 추가한다.
<head>
    ...

	<!-- TOC -->
	<script src="https://cdnjs.cloudflare.com/ajax/libs/tocbot/4.11.1/tocbot.min.js">	</script>
	<link rel="stylesheet" href="https://cdnjs.cloudflare.com/ajax/libs/tocbot/4.11.1/tocbot.css">

    ...
</head>
아래는 실제로 추가한 사진이다.

2. </body> 바로 위 부분에 스크립트 추가
</body> 로 끝나는 바로 위 부분에 다음의 script 코드를 추가한다.
<!-- TOC -->
	<script>
    	const contentBodySelector = '.article-view'
		var content = document.querySelector(contentBodySelector)
		var headings = content.querySelectorAll('h1, h2, h3, h4, h5, h6, h7')
		var headingMap = {}

		Array.prototype.forEach.call(headings, function (heading) {
				var id = heading.id ? heading.id : heading.textContent.trim().toLowerCase()
									 .split(' ').join('-').replace(/[\!\@\#\$\%\^\&\*\(\):]/ig, '')
				headingMap[id] = !isNaN(headingMap[id]) ? ++headingMap[id] : 0
				if (headingMap[id]) {
					heading.id = id + '-' + headingMap[id]
				} else {
					heading.id = id
				}
			})

		tocbot.init({
			tocSelector: '.toc',
			contentSelector: contentBodySelector,
			headingSelector:'h1, h2, h3',
			hasInnerContainers: false
		});

		$(document).ready(function(){
			$('.toc').addClass('toc-absolute');

			var toc_top = $('.toc').offset().top - 165;
			$(window).scroll(function() {
				if ($(this).scrollTop() >= toc_top) {
					$('.toc').addClass('toc-fixed');
					$('.toc').removeClass('toc-absolute');
				} else {
					$('.toc').addClass('toc-absolute');
					$('.toc').removeClass('toc-fixed');
				}
			});
		});
	</script>
스크립트 첫 라인의 contentBodySelector상수에 자신의 글 본문이 작성되는 class명을 적용해준다.
글 본문이 작성되는 class를 보기위해선 다음과 같이 작성 글에서 제목 부분을 우클릭 한 후 "검사",
개발자도구에서 보이는 소스에 마우스를 대어 영역을 확인해보며, 글이 작성되는 div가 어디인지 확인해보면 된다.


본인의 블로그는 작성되는 글이 "articla-view"라는 클래스를 가진 div안에 있어서
아래는 이를 적용한 모습이다.
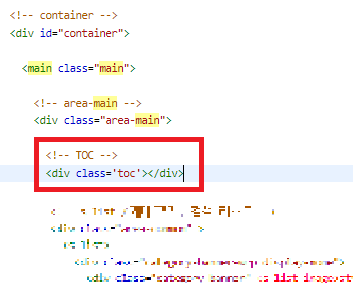
3. TOC를 표시할 div 추가
현재 사용하고 있는 오디세이 스킨 기준으로 아래와 같이 <main class="main> 혹은 <div class="area-main"> 내부 첫번째에 바로 선언해도 문제 없는것으로 보인다.
  	    ...
            <!-- TOC -->
            <div class='toc'></div>
            ...
아래는 이를 적용한 모습이다.
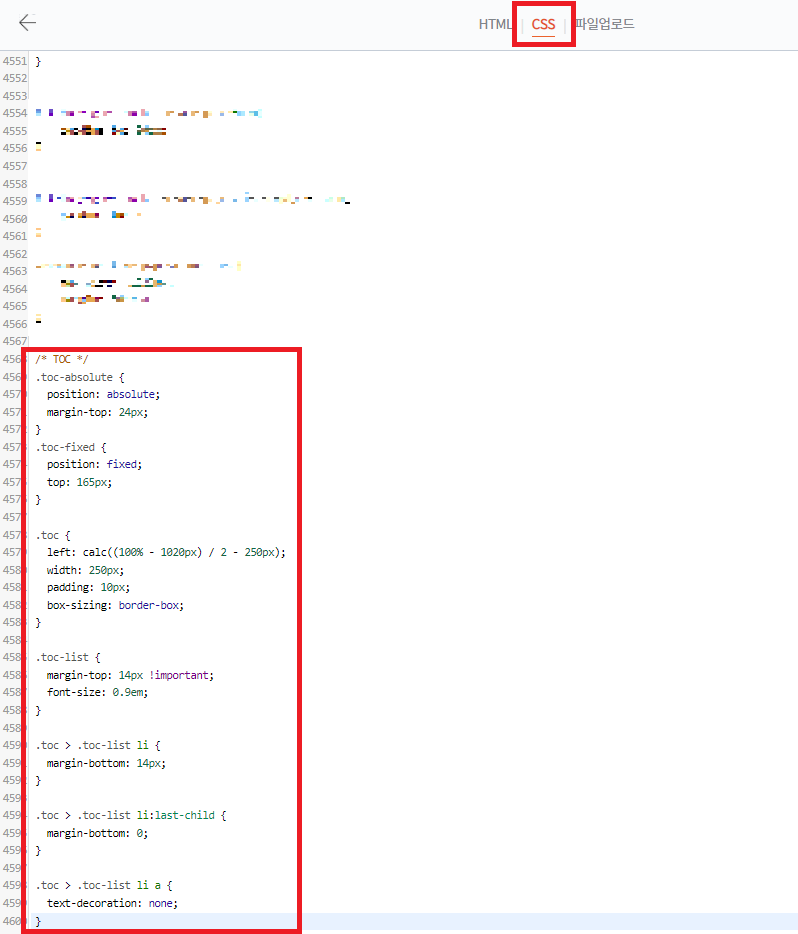
4. CSS 편집
TOC 내부 목차, 위치 등을 조절하는 CSS이다.
각자의 페이지 레이아웃에 맞게, 취향에 맞게 수정하면 된다.
/* TOC */
.toc-absolute {
  position: absolute;
  margin-top: 24px;
}
.toc-fixed {
  position: fixed;
  top: 165px;
}

.toc {
  left: calc((100% - 1020px) / 2 - 250px);
  width: 250px;
  padding: 10px;
  box-sizing: border-box;
}

.toc-list {
  margin-top: 14px !important;
  font-size: 0.9em;
}

.toc > .toc-list li {
  margin-bottom: 14px;
}

.toc > .toc-list li:last-child {
  margin-bottom: 0;
}

.toc > .toc-list li a {
  text-decoration: none;
}
아래는 이를 적용한 모습이다.
#Reference
https://tscanlin.github.io/tocbot/
Tocbot
Tocbot builds a table of contents (TOC) from headings in an HTML document. This is useful for documentation websites or long markdown pages because it makes them easier to navigate. This library was inspired by Tocify, the main difference is that Tocbot us
tscanlin.github.io
'ETC' 카테고리의 다른 글
| ESLint와 Prettier (2) - VSCode에 ESLint와 Prettier설치 (0) | 2022.10.17 |
|---|---|
| ESLint와 Prettier (1) - ESLint와 Prettier의 차이점 (0) | 2022.10.17 |
| Ubuntu 18.04 관리자 권한으로 폴더 프로그램 사용 (0) | 2022.09.29 |
| [VSCode] Prettier 확장 / .prettierrc 파일 작성법 (1) | 2022.05.15 |
| DLL, SO가 무엇인가? (0) | 2022.03.28 |